What better way is there to spend multiple consecutive weekends than sitting at your computer, redesigning a mechanism that has existed for decades, all to be able to 3D print something that can be bought at the store for less than $1? ... That's right, anything. However, when your co-worker throws down the gauntlet there is only one thing to do. Take it up.
.JPG)

 In this design, the lead is pushed out incrementally by rotating the back of the pencil, which rotates a screw. There are 12 detents per revolution that allow the lead to be locked in position. These detents give a nice "click" sound when the back end is rotated. Rotating it clockwise will push the lead out about 1.2mm per click. Rotating in the opposite direction will allow the lead to be pushed back into the pencil. The back end can also be popped apart from the pencil which allows the lead to be fully back driven. In this mode, the detent mechanism is declutched from the screw so that any force applied to the lead will cause it to back drive the screw and retract into the pencil.

One detail that stands out with the design, like all my printed assemblies, is that this has a lot of holes in it. It looks like Swiss cheese. This, again, is primary for cleaning out the support material. Although, I do try my best to not make all the holes look too stupid. Another side benefit of the holes, besides styling, is that they allow for viewing of the internal mechanisms.
.JPG)
Update 4/28/17:
I spend some time in June of 2016 trying to once again make this design usable with the SLS Nylon process through Shapeways. I had the thought of simply making the pencils bigger in order to decrease the impact of the dimension error when printing these parts. Although this directly countered the goal I had set of making a normal sized pencil, I was at the point where having something to produce was better than nothing at all.
I decided to increased the dimensional size by 30% and 50%, about the radius only, and increased the size of the lead to 1.3mm. This accomplished my goals while still allowing me to get the pencils in a variety of colors. I was very prepared for the pencils to look huge and stupid, but to my amazement, they looked pretty cool. Despite the size increase, they had a somewhat fun and comical appearance. This was even true for the 50% scaled version - I had honestly thought this would be too big. I was so surprised that I thought of making a +75% scale or 2x scale version. Below, the orange pencil is the normal size, the red is the +30% scale, and the green is the +50% scale version.

There were, of course, some small tweaks I had to do to the design due to the size increase, but nothing major. The only issue, however, that was a show stopper was that the lead could not be pushed back into the pencil. This was because the pencil got so big that the friction in the mechanism was too great. This was very disappointing to me because I always felt this feature was very cool. I haven't yet decided what to do about about this as my time and motivation to work on this has been sporadic. I might be able to find a solution or I may have to scrap the design and start over and do something simpler. More to come...
Update 3/21/19:
I haven't done anything with this and I've gotten requests to release the files, some more polite than others. This model is very difficult to print and I'm sure some people will get confused when their home FDM printers can't make it. Oh well. I released the files on Thingiverse anyway: https://www.thingiverse.com/thing:3509004 . Have fun?
.JPG)
This is how the 3D printed mechanical pencil came to be. Luckily though, it actually works pretty well and has enough style to spare.
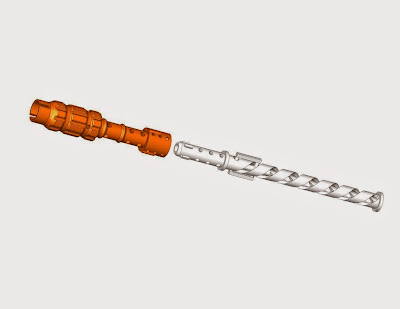
This pencil has 4 separate parts and was printed fully assembled as shown in the image below. Its about 6" long and 1/2" in diameter at its maximum, not including the pocket clip. It takes standard 0.9mm lead and 7mm diameter erasers. Three extra pieces of lead can be stored behind the eraser. I would have liked to do a more common lead size like 0.7mm or 0.5mm but the feature sizes required to hold lead that small are very difficult to achieve even on high resolution printers. Its not impossible but I decided to focus more on getting something working than getting something that was perfect.

I went though a couple prototypes where I was just modifying the standard mechanical pencil design ("hysteresis collet") for printing. It didn't take long before I accepted that the standard design is ill suited for printing - there is too much reliance on spring force and tight fitting parts. The only way I had around that obstacle was to reinvent the design for 3D printing. I came up with a couple of concepts but settled on a lead-screw design.


At the front of the pencil, 3 small fingers grab the lead and apply some friction to prevent the lead from falling out of the pencil. New lead is inserted through the tip.

I tried to retain all the core functionality of a mechanical pencil with this design. I believe I accomplished that. Moreover, it looks cool and functions well. I am glad with how this project came out. For reference, this was printed on an Objet Eden printer.
.JPG)
I spent parts of the last 6 months modifying the design to work with less precise printers. The hope was to not only allow the pencil to be printed out of more common plastics, like Nylon, but also to allow it to be printed with more common and less expensive processes like SLS. I went through 5 iterations before I got a good working version printed in SLS Nylon, pictured above. After I opened up the design for purchase I started seeing, and hearing, about pencils not working for one reason or another. I found that, for some reason, there appeared to be much more variability in the production process than I originally saw during my design iterations. I saw large variations in dimensional tolerances as well as material properties. I have thoughts as to what is causing this but it is currently making the design non-producible. I'll continue to investigate different avenues to allow this design to be purchasable. Right now it is on Shapeways but not available for purchase: Mechanical Pencil.
Update 4/28/17:
I spend some time in June of 2016 trying to once again make this design usable with the SLS Nylon process through Shapeways. I had the thought of simply making the pencils bigger in order to decrease the impact of the dimension error when printing these parts. Although this directly countered the goal I had set of making a normal sized pencil, I was at the point where having something to produce was better than nothing at all.
I decided to increased the dimensional size by 30% and 50%, about the radius only, and increased the size of the lead to 1.3mm. This accomplished my goals while still allowing me to get the pencils in a variety of colors. I was very prepared for the pencils to look huge and stupid, but to my amazement, they looked pretty cool. Despite the size increase, they had a somewhat fun and comical appearance. This was even true for the 50% scaled version - I had honestly thought this would be too big. I was so surprised that I thought of making a +75% scale or 2x scale version. Below, the orange pencil is the normal size, the red is the +30% scale, and the green is the +50% scale version.

There were, of course, some small tweaks I had to do to the design due to the size increase, but nothing major. The only issue, however, that was a show stopper was that the lead could not be pushed back into the pencil. This was because the pencil got so big that the friction in the mechanism was too great. This was very disappointing to me because I always felt this feature was very cool. I haven't yet decided what to do about about this as my time and motivation to work on this has been sporadic. I might be able to find a solution or I may have to scrap the design and start over and do something simpler. More to come...
Update 3/21/19:
I haven't done anything with this and I've gotten requests to release the files, some more polite than others. This model is very difficult to print and I'm sure some people will get confused when their home FDM printers can't make it. Oh well. I released the files on Thingiverse anyway: https://www.thingiverse.com/thing:3509004 . Have fun?