This past Halloween I really wanted to make something impressive. I still wanted to pluck something from my favorite movie, Pacific Rim, to continue my theme from last year. I already had a nice leather jacket with the Gipsy Danger logo, a kaiju kill count row, and some patches. This year I needed something better... more complicated...

It didn't take long for my focus to shift toward the star jaeger's eye candy, the thing that really made it visually pop - the cool Iron-Man-like chest turbine thing. Specifically, in the context of the movie, it's called a Nuclear Vortex Turbine (NVT). What it really does, and how it technically works probably isn't a good question to ask... Just know that it looks really cool. This was the perfect thing to not only make, but also make function. I needed it to spin. I needed it to glow.
My plan was to make something I could wear on my chest that would be heavily modeled after the NVT from Gipsy Danger. I would use leather straps around my shoulders and chest to hold it in place and give it a little bit of a steampunk theme. I would put lots of LEDs inside to make the whole thing glow to give it the appearance of fire, like the movie. The turbine part would use a motor to spin slowly and give it that last bit of cool factor.

I started by creating a CAD model of all my 'known' parts: batteries, battery holders, LEDs, motor, bearings, switches, etc. Then I played around with mounting all those things as densely as I could so I could give lots of room for the turbine. This turned out to be a little tricky since I wanted the NVT to look like it had depth. This excluded anything from being placed in or under the turbine itself because I didn't have any thickness to spare. I ended up cramming everything in a ring just outside the radius of the turbine blades, right under the blue ring. This whole design process took me about 2 weeks to finish, working on it on weekends and after work.

Now that everything was designed it was time for printing. I had 5 custom pieces in this assembly that all needed to be 3D printed, hand cleaned for paint, tapped for screws, and then painted and sealed. The above picture is of all the parts after cleaning and halfway through tapping the screw holes.

I did a quick fit check with all the electrical parts before painting just to make sure they all fit. After that I covered all the surfaces with a black primer and then painted everything with metallic acrylic paint. Last, I sprayed on a satin clear coat to seal the paint.
All the lights, like in my steampunk Nerf gun, are wide angle white LEDs. For this application I needed them to be orange. I bead blasted the outer surface of the LEDs to frost them and then used a Sharpie air brush kit to apply the orange color. This worked very well and is a nice, quick way to make any color LED that is needed.

I had recesses and pins in the printed parts to locate the battery holders, switches, and motor. The wiring took a bit of thought to route but turned out well. The LEDs are run off 2 of the N sized alkaline batteries and the motor off the 3rd. One switch activates the motor and the other the lights. Since everything was so packed together, all the parts with LEDs needed to be able to come apart. I put electrical connectors on these to allow for easy disassembly.

The very first part to get installed is the light ring / bowl. This immediately cuts off access to the batteries, meaning everything needs to be taken apart to change them. It's a bit of a pain but necessary to get the size down. The turbine itself sits on two thin section bearings around the center hub, which also has an integrated LED. The hub, which does not spin, and the light ring screw down to the base.

In order to get the turbine to spin slowly, and let the motor run fast & efficient, I needed a large reduction between the two. A belt drive turned out to be a nice solution because of the space limitations, easy implementation, and low noise while running. At first I made pulleys for the motor but the turbine turned too quickly. I eventually just ran the belt directly off the motor shaft. This gave me a ~90:1 reduction with an output speed of about 3 rev/s. The 'belt' I used is just a silicone o-ring. Silicone will last for a long time in applications like this: low speed & low force. When not in use for long periods, I take it off the motor and leave it around the turbine just to be nice to it.

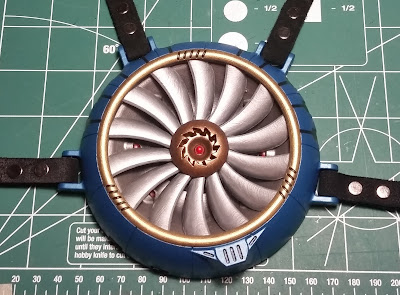
Once everything is in place the cover can be screwed on. For a size reference: at the base the diameter is 4.75", it is 1" tall, and the opening for the turbine is 3.25". The switches for the lights and motor can be accessed from the outside and can be turned on separately. I found that the run time on the motor is about 6-7 hours and the lights will probably do about double that.

All together, this weighs in around 200g. I had to add a 100g lead weight on my back, on the ring where all the straps come together, to prevent this from sinking down my chest over the course of wearing it.

During the day the sun will overpower the LEDs. However, once inside, outside around dusk, or in the dark, it gives off a great orange glow.


It didn't take long for my focus to shift toward the star jaeger's eye candy, the thing that really made it visually pop - the cool Iron-Man-like chest turbine thing. Specifically, in the context of the movie, it's called a Nuclear Vortex Turbine (NVT). What it really does, and how it technically works probably isn't a good question to ask... Just know that it looks really cool. This was the perfect thing to not only make, but also make function. I needed it to spin. I needed it to glow.
My plan was to make something I could wear on my chest that would be heavily modeled after the NVT from Gipsy Danger. I would use leather straps around my shoulders and chest to hold it in place and give it a little bit of a steampunk theme. I would put lots of LEDs inside to make the whole thing glow to give it the appearance of fire, like the movie. The turbine part would use a motor to spin slowly and give it that last bit of cool factor.
I started by creating a CAD model of all my 'known' parts: batteries, battery holders, LEDs, motor, bearings, switches, etc. Then I played around with mounting all those things as densely as I could so I could give lots of room for the turbine. This turned out to be a little tricky since I wanted the NVT to look like it had depth. This excluded anything from being placed in or under the turbine itself because I didn't have any thickness to spare. I ended up cramming everything in a ring just outside the radius of the turbine blades, right under the blue ring. This whole design process took me about 2 weeks to finish, working on it on weekends and after work.

Now that everything was designed it was time for printing. I had 5 custom pieces in this assembly that all needed to be 3D printed, hand cleaned for paint, tapped for screws, and then painted and sealed. The above picture is of all the parts after cleaning and halfway through tapping the screw holes.

I did a quick fit check with all the electrical parts before painting just to make sure they all fit. After that I covered all the surfaces with a black primer and then painted everything with metallic acrylic paint. Last, I sprayed on a satin clear coat to seal the paint.
All the lights, like in my steampunk Nerf gun, are wide angle white LEDs. For this application I needed them to be orange. I bead blasted the outer surface of the LEDs to frost them and then used a Sharpie air brush kit to apply the orange color. This worked very well and is a nice, quick way to make any color LED that is needed.

I had recesses and pins in the printed parts to locate the battery holders, switches, and motor. The wiring took a bit of thought to route but turned out well. The LEDs are run off 2 of the N sized alkaline batteries and the motor off the 3rd. One switch activates the motor and the other the lights. Since everything was so packed together, all the parts with LEDs needed to be able to come apart. I put electrical connectors on these to allow for easy disassembly.

The very first part to get installed is the light ring / bowl. This immediately cuts off access to the batteries, meaning everything needs to be taken apart to change them. It's a bit of a pain but necessary to get the size down. The turbine itself sits on two thin section bearings around the center hub, which also has an integrated LED. The hub, which does not spin, and the light ring screw down to the base.

In order to get the turbine to spin slowly, and let the motor run fast & efficient, I needed a large reduction between the two. A belt drive turned out to be a nice solution because of the space limitations, easy implementation, and low noise while running. At first I made pulleys for the motor but the turbine turned too quickly. I eventually just ran the belt directly off the motor shaft. This gave me a ~90:1 reduction with an output speed of about 3 rev/s. The 'belt' I used is just a silicone o-ring. Silicone will last for a long time in applications like this: low speed & low force. When not in use for long periods, I take it off the motor and leave it around the turbine just to be nice to it.


Once everything is in place the cover can be screwed on. For a size reference: at the base the diameter is 4.75", it is 1" tall, and the opening for the turbine is 3.25". The switches for the lights and motor can be accessed from the outside and can be turned on separately. I found that the run time on the motor is about 6-7 hours and the lights will probably do about double that.

All together, this weighs in around 200g. I had to add a 100g lead weight on my back, on the ring where all the straps come together, to prevent this from sinking down my chest over the course of wearing it.

During the day the sun will overpower the LEDs. However, once inside, outside around dusk, or in the dark, it gives off a great orange glow.

I really liked this project. It was one of those ideas that developed quickly while still requiring a fair amount of work and thought to complete. In short: it was a good challenge. This coming year I hope to do something at least as challenging and intricate as this, if not more so.